

In the previous article we made an introduction about this project and its scope. We also saw the tools that we are going to use. Now we are going to configure these tools and prepare the work environment to start the development, in a comfortable way. But first we will clarify what is the work scheme we want to achieve.
In the previous article we made an introduction about this project and its scope. We also saw the tools that we are going to use. Now we are going to configure these tools and prepare the work environment to start the development, in a comfortable way. But first we will clarify what is the work scheme we want to achieve.
How will you compile our compiler?
The compiler we are creating will work in the common way that most compilers that compile to native code work (such as C, C ++, Pascal, or Go, not like Java or C #), except perhaps because of the need for an additional step .
The idea of compilers is to generate an executable from a source code. In the case of a C program, the process would be something like this:
    <test.c>
         |
     Compiler
         |
    <test.obj>
         |
     Linker
         |
    <test.exe>
Where you can see that compilation is only the first step. Then it is necessary to use a linker to finally generate the executable file. The compiler generates a * .obj file (object code) that is already machine code, but without structure.
The linker does the job of building an executable by analyzing the calls to the subroutines and modules that are made in the program. One of the functions of the linker is, for example, to remove subroutines that are not used.
In this project we will create a compiler, not a linker and we will not generate a * .obj file directly, but we will generate a file in assembler * .asm.
Most of the work we will do, in this project, will be to obtain an executable that will be our compiler and will be called “titan.exe”.
Then we could use this program to compile a source code, which could be «test.tit» and the final result should be «test.exe»:
We can schematize this flow:
     <test.tit>
          |
Our "titan" Compiler
          |
     <test.asm>
          |
  Assembler "MASM32"
          |
     <test.obj>
         |
  "Polink" linker
          |
     <test.exe>
As you can see, the compilation flow goes through different stages, creating intermediate files at each stage. The «Polink» linker comes with MASM32, so if we have installed the MASM32 we already have it.
Except for the use of the assembler, our compiler will work the same as most native code compilers. But this is not uncommon, because there are many compilers that also use an assembler to generate object code.
Work folder
As we said in the previous article, this compiler will compile over Windows, and also for Windows, so it is clear that we will need a Windows operating system. Although our compiler will generate binary code for 32 bits, we can work on Windows 32 or 64 bits.
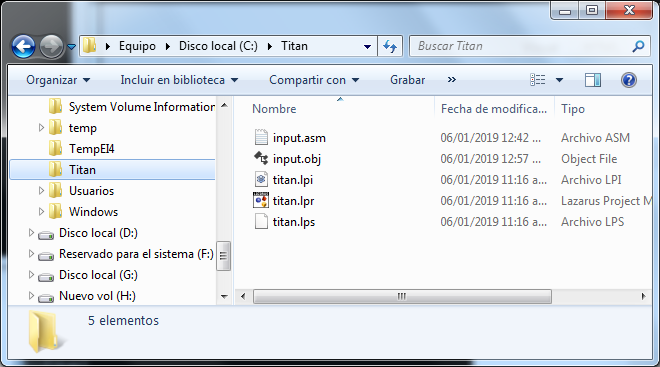
First, we must choose a folder on our disk, where we will be creating the necessary files. For convenience it is good to create the folder in the same unit where we have the MAS32 installed. In my case I have installed it in “C: \ masm32 \” so I will create my work folder in C: and call it “c: \Titan”, because this is the name of the project, as well as the programming language that We will create (See the following article).
This will be the only working folder, and here we will be placing all the files that make up the project.
It is important to ensure that the user has access and privileges to read, write, delete and modify this folder so as not to hinder the development process.
Creating the project in Lazarus
As a first step we will create the project in Lazarus that we will use to create our compiler.
As I mentioned, I am going to use Lazarus because it is a free and quite comfortable IDE to work on, I also hope that the language to be used is similar to Pascal’s syntax and some Basic, since I do not plan to create old-style C languages, because of those there are already many (C ++, Java, PHP, awk, …) and I personally do not support that style of syntax.
However, at this level, the reader can choose his favorite environment (and language) for development. The goal here is just to start from a tool that allows me to create an initial version of the compiler with a simple syntax. You can even use an interpreter (like Python) and not necessarily a compiler, because the idea is that this project is a functional compiler, but finally the code will be rewritten in the language of the compiler itself.
To create the project, we open the Lazarus IDE and create a new project of the “Simple Program” type:
This will create a console application (without GUI), and with the minimum code:
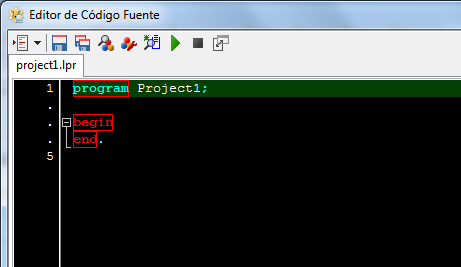
In my case, I have configured my Lazarus editor with a black background using the menu options:> Tools> Options> Editor> Colors.
It is necessary to create a console application because we do not forget that this code will be rewritten later in the language of the same compiler, and it must also be a console application for its simplicity.
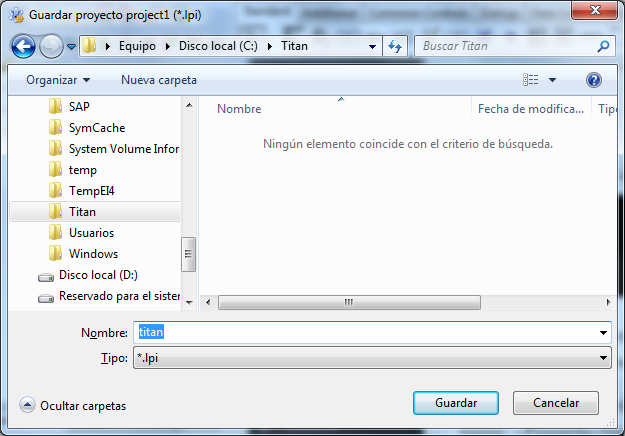
Now we must save the project in the new folder we have created (C: \ Titan \). For this we use the menu:> Project> Save Project as … and we give it the name «titan»:
After this, we will have our project created and ready to start developing it. But we won’t write anything yet.
In the “C: \ Titan” folder, 3 files (titan.lpi, titan.lpr, and titan.lps) must be created that correspond to the 3 files in this project.
Configuring the MASM32
The next step is to configure the assembly and linking of an assembly file, using the MASM32.
This task is important because in the development of the compiler we will need to carry out many sessions of “Compilation-> Assembled-> Linked”.
It is recommended that the user first become familiar with the use of MASM32 to have a better understanding of this step. There is enough information on the network.
The objective of this step is to achieve the assembly and linking of an assembly file to generate an executable.
The first thing we are going to do is create, in the “C: \ Titan \” folder, a file with the name “input.asm” which is a file where we will place the source code in assembler. We can do it with any text editor. Within this file we can place the following code:
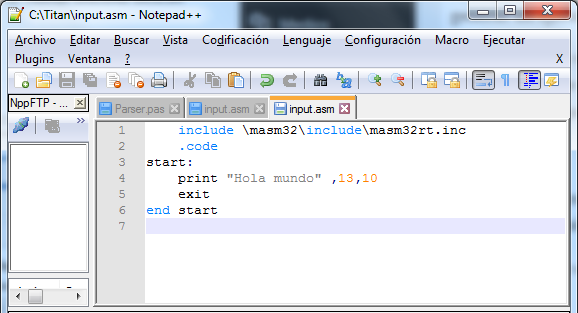
This will be our “Hello world” program in assembler that we will process with the MASM32. The only job this code does is write «Hello world» on the console. It is not the subject of these articles, teach programming in assembler. The reader would do well to review information about it such as the one shown at: http://www.cs.virginia.edu/~evans/cs216/guides/x86.html or http://win32assembly.programminghorizon.com/tutorials .html .
To assemble this code, we can open the CMD and run the MASM32 assembler:
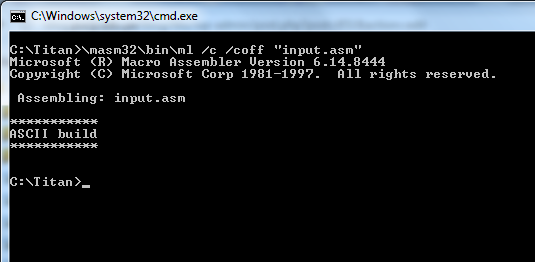
We call the program «ml», because this is the name of the MASM32 assembler, and we use the «/ c» parameter to only perform the assembly because «ml» can also perform the binding. The / coff parameter is to define the format of the object file.
If all goes well, this should generate the file «input.obj»:
But the “input.obj” file is not yet the executable, so the next step is to link this object code, using a linker:
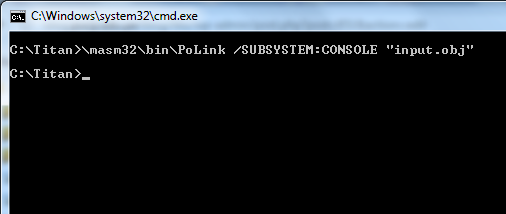
This linker is a silent program and will not display messages as long as there are no errors. The / SUBSYSTEM parameter is to indicate what type of application we want to generate.
If everything went well, we will have our executable file, and we can execute it, obtaining the following output.
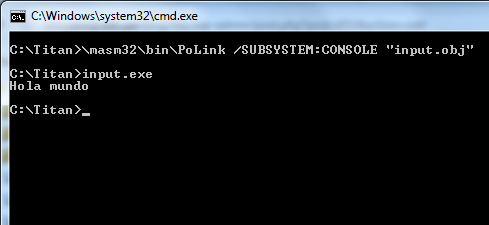
What we have seen here is a complete Writing, Assembly and Linked session, and it is what used to be done before when programming in pure assembler.
As we do not want to be constantly executing the same commands, it is convenient to write a * .bat file, which automates the assembly, linking and, in passing, the execution. To do this we will create the file: “test.bat” with the following content:
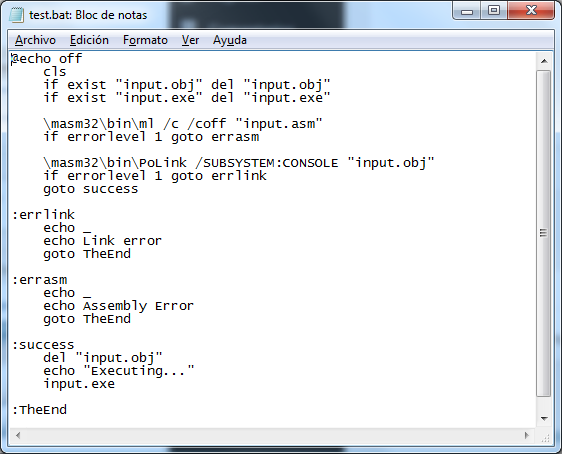
In addition, the assembly and linking code, what this code does is to verify the possible errors, to run the program only if there have been no errors.
Then, every time the assembly program is modified, we can launch this “bat” to assemble / link / execute easily.
If you do not know what a “bat” file is or have had difficulties in understanding any of the steps indicated here, it is advisable to read a little, and investigate, on difficult issues, before proceeding.
Assuming that we have been able to achieve these steps successfully, we are ready to start the development of the compiler, but first we will define a programming language, in the following article.
![]() ¿Cómo citar este artículo?
¿Cómo citar este artículo?
- En APA: Hinostroza, T. (17 de septiembre de 2021). Create Your Own Compiler – Part 2 – Preparing the work environment. Blog de Tito. https://blogdetito.com/2021/09/17/create-your-own-compiler-part-2-introduction/
- En IEEE: T. Hinostroza. (2021, septiembre 17). Create Your Own Compiler – Part 2 – Preparing the work environment. Blog de Tito. [Online]. Available: https://blogdetito.com/2021/09/17/create-your-own-compiler-part-2-introduction/
- En ICONTEC: HINOSTROZA, TIto. Create Your Own Compiler – Part 2 – Preparing the work environment [blog]. Blog de Tito. Lima Perú. 17 de septiembre de 2021. Disponible en: https://blogdetito.com/2021/09/17/create-your-own-compiler-part-2-introduction/
Dejar una contestacion